


|
Step 1 - Introduction & Preperation Step 2 - Drawing & Building your Car Part 1 Part 2 Part 3 Step 3 - Coloring your Car |
Step 4 - Adjusting Car Scale & Alignment Step 5 - Adding Car Wheels Step 6 - Setting up Car Stat & Physics Step 7 - Test Driving your Car |
|
Step 2 - Drawing & Building Your Car
Using the items you got in step 1, we are going to start by drawing a very simple car. (As a start your first car should always be a very simple one in order to make things easy and clear, to give you better understanding of how things work). We are going to draw using the ruler, we will use the ruler to draw the car with straight lines only. 
We start by drawing the car from its outline, a very simple and boxy car using the ruler. Draw it from its outline only and draw it from its right side pointing this way => Here is our drawing: 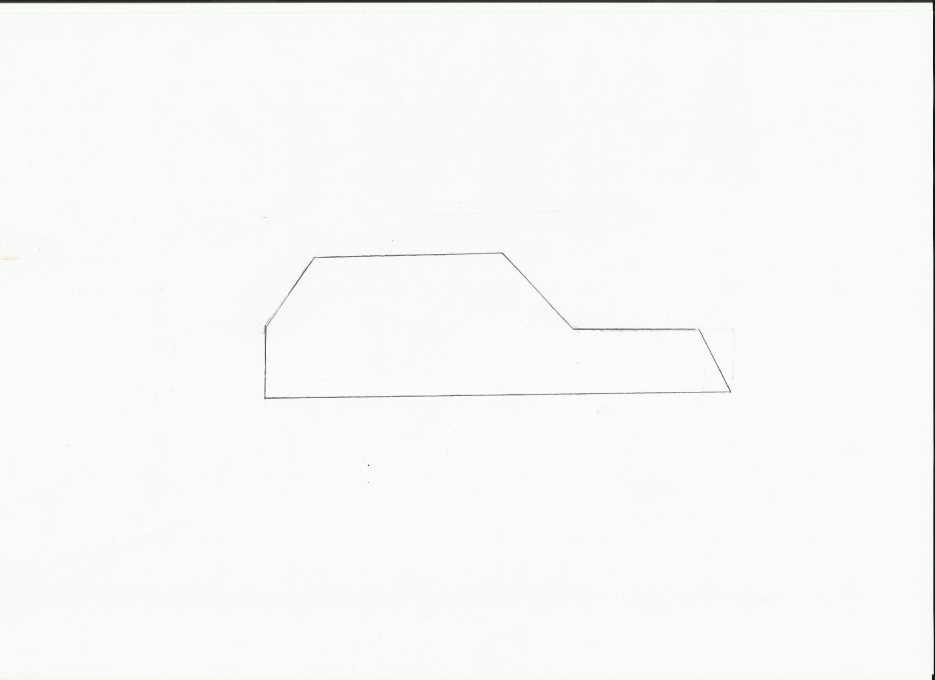
Have you drawn a similar outline of a car yet? if yes continue: Now by drawing straight lines only as well, divide the car into different pieces like this: 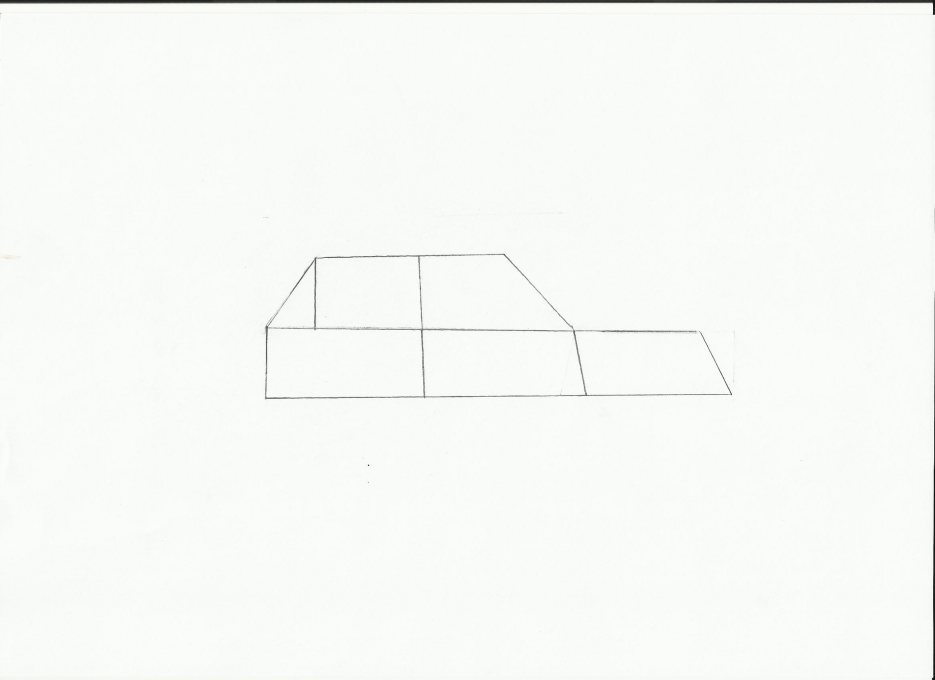
After dividing the car into pieces by drawing: Draw two straight lines perpendicular to each other and through the center of the car. One line from top to bottom and the other from left to right. These lines will be the Y and Z Axis of the car! The top to bottom line will be the Y Axis where the top part is for the negative numbers and the bottom part is for the positive numbers. The left to right line will be the Z Axis where the left part is for the negative numbers and the right part is for the positive numbers. Having trouble understanding this? Never mind! It is better to show you, just draw lines like this: 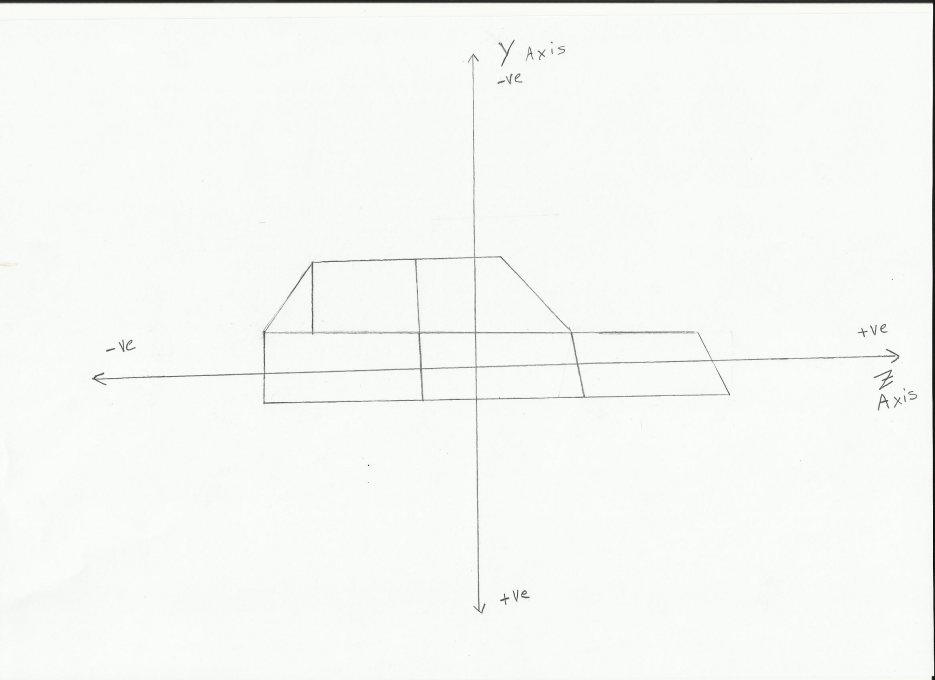
After drawing the Y & Z Axis above, woundering where the X Axis is? Well we are only going to imagine the X Axis and not draw it, becuase we can't. Hold the paper in your hands and imagine a third line passing through the drawing like this: (Don't draw anything just imagine it...) 
Now that you have imagined the X Axis, let's start building the car! We start by finding one point and measuring its X, Y and Z location. A point is the spot in the drawing at which any two lines or more meet. Chose any point on your car and measure its distance along each Axis using the ruler. Like this, first choose a point: 
Have you choosen a point? good. Lets measure the Z location of that point (its distance along the Z Axis). Using the ruler measure the distance of that point from the 0 point of the Z Axis. (The 0 point is the Z Axis is the Y Axis itself as long as you keep the ruler parallel to Z axis or in another sense perpendicular to Y Axis). Measure the distance like this: 
In the drawing above we have found that distance of the point along the Z axis is 7 cm. Now measure yours. Are you using a ruler with Inches? That's ok, measure it in Inches it works just as well. Did you measure your point's distance along the Z? If yes, please write it down somewhere safe so you do not forget it. Now similarly let's measure the distance along the Y Axis to find the Y location of the point: 
Did you measure your point Y location? Now notice in the drawing above because our point lays in the -ve section of the Y Axis (above the Z Axis) its Y location will get a -ve value! So our Y location = -1 cm Did you understand why the Y location is -1 cm and not 1 cm? Please make sure you do. What about your point's Y location is it also -ve? And what about your previously measured Z location was it also in the +ve like ours? We have found the Z & Y locations of the point, now what is missing is its X location. Because the X Axis is imaginary and for the sake of making things easy in this tutorial, lets just give X a 0 value for now. So now for our point we have: X = 0 cm Y = -1 cm Z = 7 cm We will need to multiply these numbers by 10 to convert them into pixel size. Whether you measured in cm or Inches, multiply all by 10! This is basically to make the scale correct so we are able to see the car in the Car Maker. But more importantly it is also to give our numbers accuracy; you see the Car Maker does read fractions, because it reads pixels. So if you had measured 1.5 cm for example and wrote in the Car Maker, the Car Maker would understand it as 1 not 1.5. You need to multiply by 10 so that the 1.5 cm or Inches becomes 15 and can be read by the Car Maker. So our numbers now become: X = 0 Y = -10 Z = 70 With the pencil we are now going to mark the chosen point in our drawing by extending a line from it, we then will write the (x,y,z) location at the end of that line, like this: (Our (x,y,z) location of the point is (0,-10,70)). 
Did you mark your point and write its (x,y,z) coordinates/location yet? Ok now let's find another a point that is also in the same piece as the first point. Similarly lets also measure its (x,y,z) location, mark it and write the numbers down: 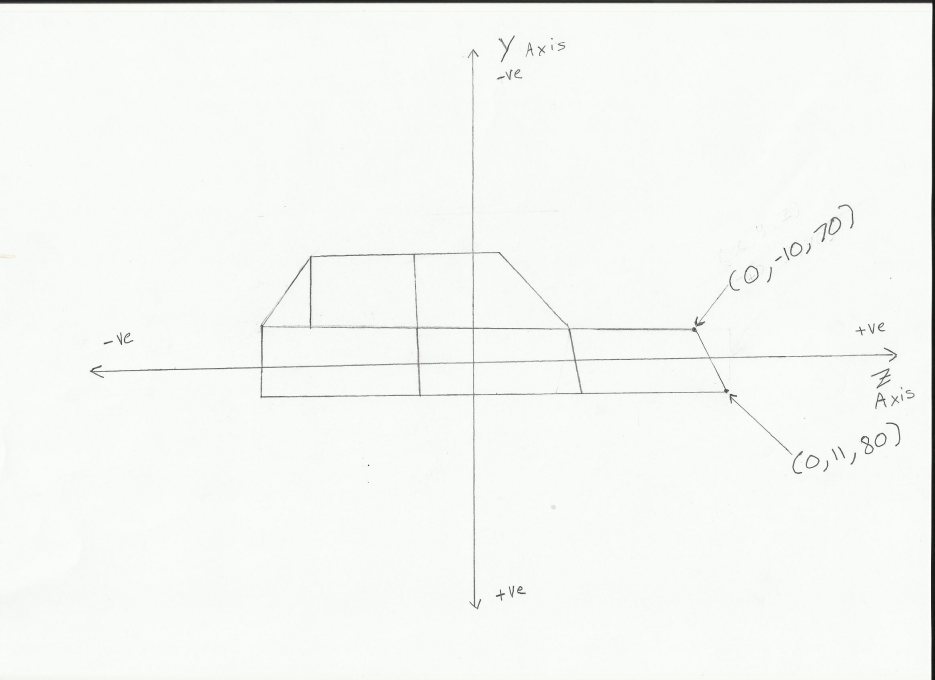
Done? Alright, now let's measure and mark all the points that make up a Piece: 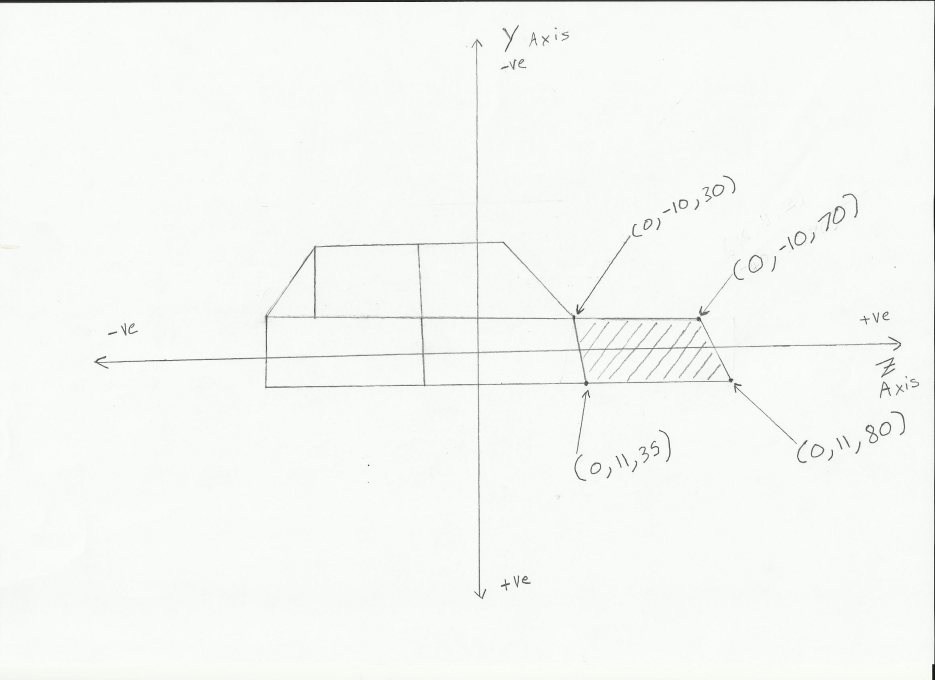
In the drawing above we have found the (x,y,z) locations of 4 points that make up one piece of the car. Normally a car piece can be made out of just 3 points, 5 points or more, not necessarily always 4 points. It all depends on the way you design your car and how you divide it into pieces through the drawing. Have you found the (x,y,z) locations of the points that make up a piece in your car drawing yet? Good, congratulations you have just virtually created your first piece of the car. Now let's choose a color for that piece. We are going to use RGB (Red, Green and Blue) values to define its color! How? Simple, first go to http://www.colorpicker.com/ and use that site's tool to choose your color then write down its RGB values: (You can also use MS Paint or any simple drawing program to get the Red, Green and Blue values of colors..) 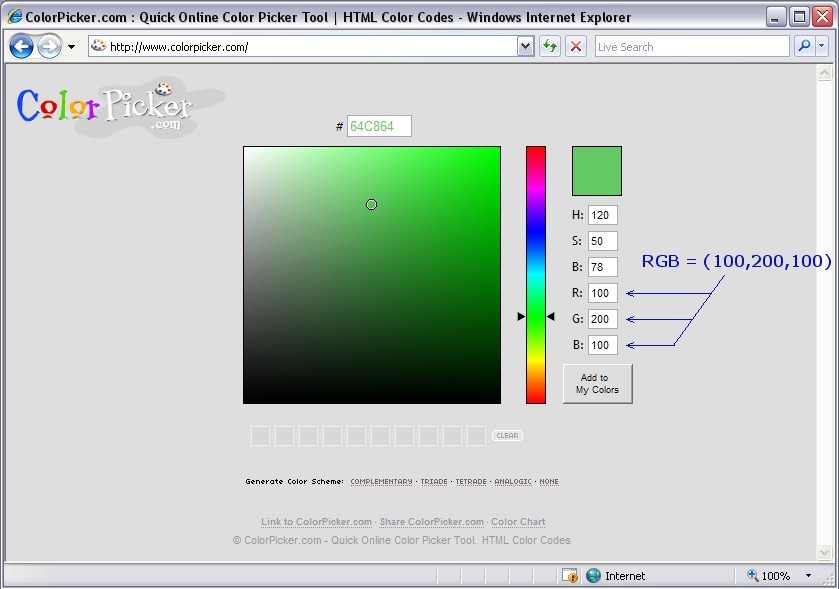
In the screen shot above we have chosen a green color where it's R=100, G=200 and B=100. Have you chosen your color yet? Ok, let's write down the chosen color for our piece in the drawing: 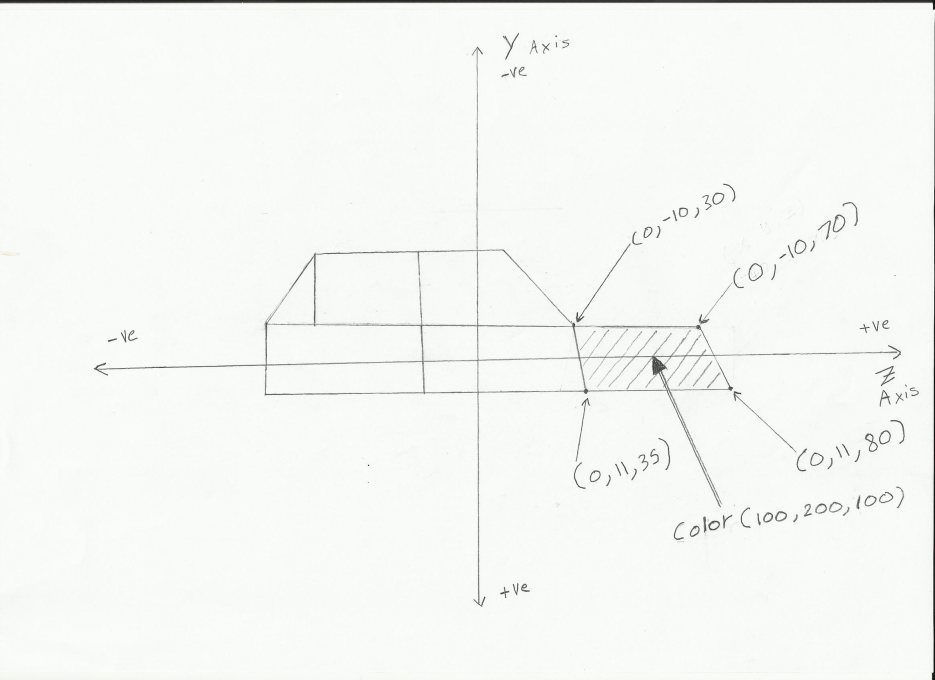
Have you written down your piece's color? Good. Let's make this piece alive (let's make it 3D in the Car Maker)! Open the Car Maker and click on the "Make New Car" button in the "Car" tab. Enter any car name you desire and click "Make Car". Click on the "Code Edit" tab and for our current example we are going to enter the following data: <p> c(100,200,100) p(0,-10,70) p(0,11,80) p(0,11,35) p(0,-10,30) </p> This is RAD 3D code! It is a simple format that was invented by us (Radicalplay.com) to create 3D models easily for our games. The Java 3D Engine that reads this format, also created by us, is called the RAD 3D Engine. The RAD 3D Engine is what is used in all the Need for Madness games and it was first created for our game Radical Aces 1 but was later perfected and turned into a "Cartoon 3D Engine" for Need for Madness... Explanation of this code: <p> means Start a new Piece (indicates the creation of a new piece). c(100,200,100) means Set the Color of the piece to 100,200,100 in RGB: c(r,g,b) p(0,-10,70) means Add a Point that represents the piece with the following coordinates (0,-10,70): p(x,y,z) </p> means the End of the Piece. Simple! All of this is demonstrated in the screen shots below:   
Have you created a new car and typed in your first piece yet? Now you can click "Save & Preview" or click "3D Edit" to view it in 3D! Here is what our piece looks like: 
Are you previewing your first car piece now? Now you can use the keyboard controls listed under "3D Controls" to rotate your piece, zoom-in zoom-out and view it from different angles. If your piece doesn't seem to be displayed correctly and looks something like this: 
Then it is crooked like that because you have not entered its points in a correct order. To enter points in a correct order: Every point typed must be connected to the point typed before it with a line (unless of course it was the first point typed and no point was typed before it). 
Congratulations now that you have created your first 3D Piece of the car, we can now proceed to Part 2 of Drawing & Building Your Car!
|